Dynamic Glyph Dilation
Eric Lengyel • April 21, 2019
Slug renders glyphs on the GPU directly from the Bézier curves that define them. No matter how complex a glyph is, only a bounding box consisting of two triangles (or a tighter bounding polygon with up to eight vertices and six triangles) is rendered by the GPU, and the pixel shader figures out how much of each pixel is covered by the glyph’s outline. When the bounding box for a glyph is rendered into a viewport, it looks like the following diagram.
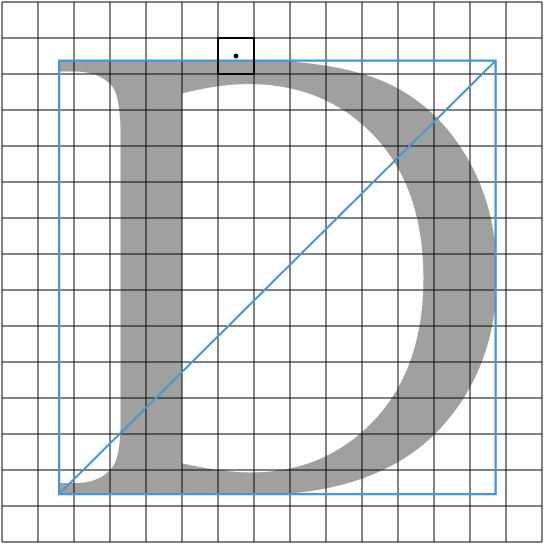
Each square represents a single pixel, and the blue lines correspond to the exact bounding box for the capital D after it has been divided into two triangles. When a triangle is rasterized by the GPU, only pixels whose centers fall inside the triangle are included. This causes a problem for pixels on the boundary of a glyph such as the one whose center point is shown at the top of the diagram. Since the center of this pixel is not inside the glyph’s bounding box, the pixel is not rendered even though a large portion of it is covered by the interior of the glyph. Ignoring this problem leads to very poor quality on the edges of the glyph, and it gets worse as the font size decreases. The correct thing to do for proper antialiasing and high-quality rendering is to fill that pixel with a value proportional to the actual coverage. But how do we get the GPU to render these pixels?
We need to make sure that all pixels touched by the glyph’s bounding box, even just a tiny bit, are included in rasterization. This can be accomplished by expanding the bounding box for the glyph by half the width of a pixel on each side, a process we call dilation. Sounds easy, right? Well, in some cases, it is. If we know ahead of time exactly how many pixels tall and wide the em square will be, which is often taken as the conventional meaning of “font size”, then we can easily calculate by how much we need to move the vertices of the bounding box to get a half-pixel dilation. The em-space dilation is simply 0.5 / font size. Because we’re dividing by the font size, as a glyph gets larger on the screen, the necessary dilation gets smaller.
Side note: Most recent GPUs support a feature called conservative rasterization, and this almost solves the dilation problem. Conservative rasterization causes all pixels touched by a triangle to be included, regardless of whether the center of each pixel falls inside the triangle. This would be great if not for the fact that pixels along the interior edge of the bounding box are touched by both triangles and thus get rendered twice. This creates a performance problem, especially considering that GPUs always run pixel shaders for 2×2 quads, and it leads to over-blending artifacts whenever we’re not simply replacing the colors in the frame buffer.
The difficulty arises when glyphs are being rendered at pixel sizes that are not easily known. For text displayed in some kind of UI, the output resolution may not be a constant, so the font size changes depending on whether the user is running at 1080p or 4K, for example. It is still straightforward to calculate the correct dilation, but it takes slightly more care to get it right. The real problem shows up when glyphs are rendered in a 3D environment, and their sizes are constantly changing. There is no longer any exact dilation that can be precalculated and incorporated into the vertex positions for each glyph’s bounding box. Furthermore, for any glyph shown in perspective, as opposed to being viewed straight on, the correct dilation isn’t even constant over the glyph’s bounding box! Vertices farther from the camera require a larger dilation than vertices closer to the camera.
The most immediate solution to this problem is to come up with a general dilation value that works acceptably well over the full range of sizes at which the glyphs are expected to be rendered. Versions of Slug before 3.5 use this method. However, care must be exercised to avoid choosing a value that’s too high because an unnecessarily large dilation negatively impacts performance when glyphs are rendered at large sizes. But we can’t choose a value that’s too low, either, because quality suffers very badly when boundary pixels are not properly included for glyphs rendered at small sizes.
The ultimate solution is to dynamically calculate minimal dilation values on the GPU for each vertex using only the information provided by the model-view-projection matrix and the viewport dimensions. I’ve discovered that this is a much more difficult calculation than it sounds like, and I have aborted several sporadic attempts to solve it over the past year or so. I’m happy to announce, however, that an elegant solution to the problem has now been implemented as the always-on method used by Slug version 3.5 and later. The CPU code and user are no longer involved in the process of choosing dilation values. It is all handled automatically by the GPU in the vertex shader, and the perfect dilation values it produces have two very positive effects: (1) Glyphs rendered at extremely small sizes are drawn with much greater quality because antialiasing is now properly applied to all pixels that could be partially covered. (2) Glyphs rendered at larger sizes now enjoy a nice performance boost due to tighter bounding boxes that don’t allow time to be wasted filling empty pixels around an over-inflated boundary.
Dynamic dilation also makes it practical to simply leave adaptive supersampling on all the time for text that could be rendered at a wide range of sizes on the screen. When the pixel shader decides that only one sample is required, the performance is always within 2–4% of the non-supersampling shader in my tests across different GPUs. The combination of adaptive supersampling and dynamic dilation makes highly minified text look nice and smooth when it’s drawn far away in a 3D scene, and it still performs extremely well when the camera gets right up next to it. Without both of these mechanisms, the text would either shimmer terribly in the distance (no supersampling or dilation too small) or perform terribly close up (dilation too large), but these issues are no longer a concern.
A demo that shows dynamic dilation in action can be downloaded from the Slug website at sluglibrary.com. In this demo, the mouse wheel lets you zoom in and out so you can make the text really small or really large. I recommend hitting the space bar four times to get to the big blurb of text on the fifth page. Once you zoom out far enough, you’ll start seeing some Moiré patterns in the text when you rotate the scene a little bit (by right-clicking and dragging). Press S to toggle adaptive supersampling, and those patterns will be smoothed out. Zoom back in and keeping pressing S to see the performance difference between the non-supersampling shader and supersampling shader choosing to take one sample.
EDIT: Supersampling is no longer part of the Slug Library, so it can’t be turned on in the demo.